Using Underlying Styles with Custom Styles
When creating custom styles, you can specify an Underlying Style that tells OneNote and Onetastic
which built-in heading level your custom style represents. This is particularly important when using macros like
TOC in Current Page that rely on heading styles to build a table of contents.
The Problem: Custom Styles Are Invisible to TOC Macros
By default, when you create a custom style without specifying an underlying style, it is treated as
Normal (regular paragraph text). Macros like TOC in Current Page only look for
OneNote's built-in heading styles (Heading 1, Heading 2, Heading 3, etc.). This means that your custom heading
styles will not appear in the table of contents at all, even if they look like headings.
With Built-in OneNote Headings
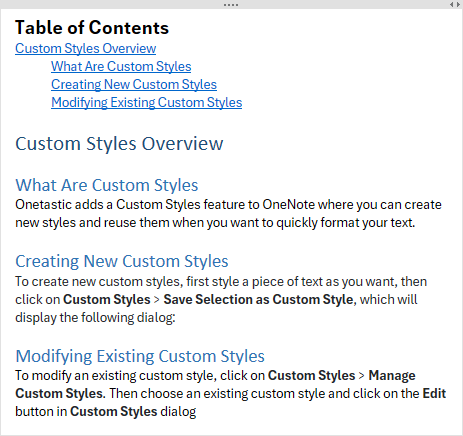
When you use OneNote's built-in heading styles (Heading 1, Heading 2, Heading 3), the TOC macro correctly
identifies and indents each heading level, creating a proper hierarchical table of contents.
With Custom Styles (No Underlying Style)
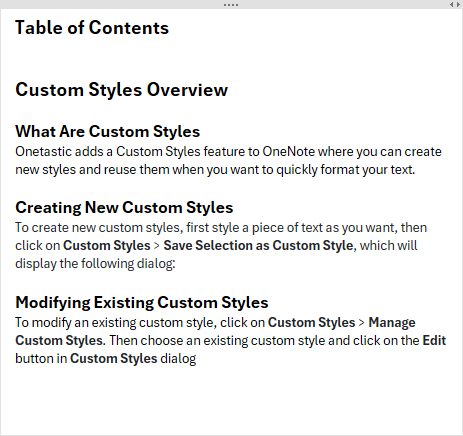
When custom styles don't have underlying styles set, they are treated as normal paragraphs and
do not appear in the table of contents at all, even though they may visually look like headings on your page.
The Solution: Set Underlying Styles
To make your custom heading styles work with TOC and other heading-aware macros, you need to set the
Underlying Style to the appropriate heading level. This tells Onetastic: "This custom style
should be treated as a Heading 1 (or 2, or 3, etc.) for macro purposes."
How to Set Underlying Styles
When creating or modifying a custom style, you can specify which built-in OneNote style it represents:
- Open the Custom Styles dialog by clicking Custom Styles >
Save Selection as Custom Style (for new styles) or
Custom Styles > Manage Custom Styles (for existing styles)
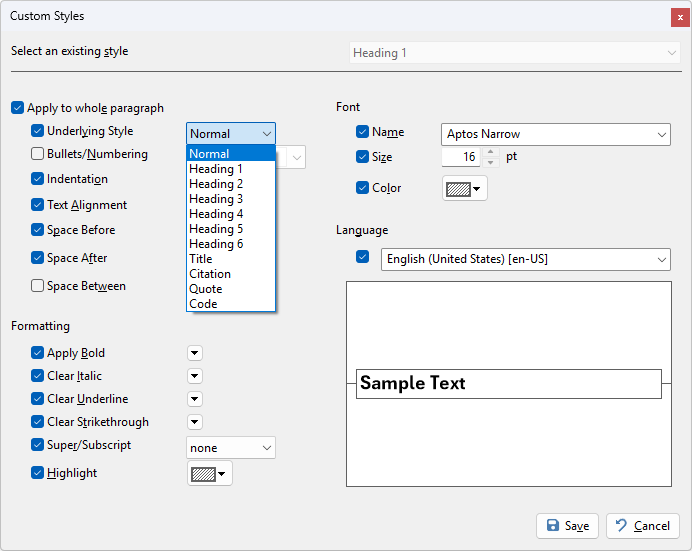
- In the Custom Styles dialog, locate the Underlying Style dropdown in the left panel
- Select the appropriate heading level that matches the logical hierarchy of your custom style:
- Heading 1 - For top-level headings (main sections)
- Heading 2 - For second-level headings (subsections)
- Heading 3 - For third-level headings (sub-subsections)
- Heading 4, 5, 6 - For deeper nesting levels
- Normal - For regular paragraph text (default)
- Complete your custom style configuration and click
Important: You Must Reapply the Custom Style
Modifying a custom style does NOT automatically update paragraphs where you previously applied that style.
Custom styles in OneNote work like a "stamp" - they apply formatting at the moment you use them, but there's no ongoing
connection between the style definition and the formatted text.
After adding or changing the underlying style setting, you must:
- Select each paragraph that uses the custom style
- Reapply the custom style to it (click the style name in the Custom Styles dropdown)
- Repeat for all paragraphs that should have the updated underlying style
Only after reapplying the custom style will those paragraphs be recognized by
TOC in Current Page and other heading-aware macros.
Example: Creating Custom Heading Styles That Work with TOC
Let's say you want to create three custom heading styles with different colors and fonts that will appear
properly in your table of contents:
- Custom Heading 1 - Dark blue, 18pt, bold
- Set Underlying Style to Heading 1
- Custom Heading 2 - Medium blue, 14pt, bold
- Set Underlying Style to Heading 2
- Custom Heading 3 - Light blue, 12pt, italic
- Set Underlying Style to Heading 3
With these underlying styles set correctly, when you run TOC in Current Page:
- Your custom headings will appear in the table of contents
- They will be properly indented according to their hierarchy level (Heading 1 = no indent,
Heading 2 = one level indent, Heading 3 = two levels indent)
Tips and Best Practices
- CRITICAL - Always reapply after modifying: If you modify an existing custom style to add or change
its underlying style, you must reapply the custom style to every paragraph that uses it. Modifying
a style does not automatically update text that was previously formatted with that style. Users often forget this step
and wonder why their headings still don't appear in TOC!
- If your custom headings don't appear in TOC: The most common reason is that their underlying
style is set to "Normal" (the default). Change it to Heading 1, 2, 3, etc. to make them visible to TOC macros.
Remember: after changing the style definition, you must reapply it to all affected paragraphs.
- Be consistent: If you create multiple custom heading styles, make sure to set their underlying
styles to reflect the logical hierarchy you want to maintain
- Update existing styles: If you already have custom heading styles without underlying styles set,
you can modify them to add the appropriate underlying style
- Test with TOC: After setting underlying styles, and reapplying the styles,
run the TOC in Current Page macro to verify
that your headings now appear and are properly indented
- You don't need underlying styles for non-heading styles: Only set underlying styles if you want
your custom style to be treated as a heading by macros. Regular text styles should remain as "Normal"